Having a patio to relax outside is one of the best parts of the summer, but sometimes, it can get hot. That is why adding a cover to your deck can allow you to spend more time enjoying the outdoors.
Patio covers come in many shapes and styles, including umbrellas and DIY pergola patio covers, which may make it a little hard to decide how exactly do you want your patio cover to be done.
In a brief nutshell, here are the steps you should take to building a patio cover:
- Measure and draw out the area you’re covering
- Choose the style of covering
- Order building materials
- Gather the proper tools
- Contact your local building department
- Dig footing holes
- Secure the corner posts
- Build and secure the rim joist
- Attach the rafters
- Install the slats on the rafters
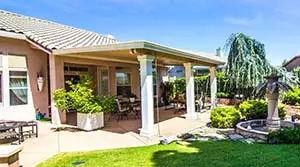
When I created a patio cover, I used a wooden patio cover, making me feel like I now have a bigger home. It also made me enjoy the outdoor living space in my home even more.
An outdoor space like a patio can benefit from a solid structure covering, and you can build it yourself just like how I did with mine.
How to Build a Patio Cover
The following is a step-by-step guide on how to build a free-standing pergola-style patio cover DIY:
1. Measure & Draw the Area You’re Covering
Any paper will work, but grid paper will help keep the drawing closer to scale. Measure the area you want to cover, taking the time to get the width, length, and height.
Drawing your patio cover on paper will help you determine the needed materials. Sketching your covering is a step missed by most DIY’ers. You can take the drawing to your local lumberyard, and they can help with what materials you will need.
2. Choose the Style of Covering
You have many options when covering a patio, including fully covered, attached to the home, or covered in asphalt shingles.
You can even go for more of a garden feel with a pergola-style unattached structure. Even patio covers are canvas material that rolls up when not used.
Consider your comfort, budget, and personality in choosing which style to pursue. Build something that will help you appreciate outdoor living even more. Looking at other DIY patio cover projects can also help you decide.
3. Order Building Materials
Choosing a local lumber yard can benefit a big box store, including better service, straighter boards, and answers to questions you have. Many local lumberyards offer free delivery of more extensive materials, another great reason to use them.
On top of that, it’s also easier to secure the quality of the materials you’ll be buying. It wouldn’t be much of a hassle if you needed something replaced or returned since the store is just a short drive away.
4. Gather the Proper Tools
If you want to complete a DIY project like covering your patio with a solid structure, you need the proper tools. You might have quite a few of the instruments in your home tool kit.
Here is a list of tools to make the work easier:
- Hammer
- Tape measure
- Drill
- Drill bits
- Circular saw
- Reciprocating saw
- Miter saw
- Square
- Level
- Chalk line
- Shovel(s)
- Round point shovel
- Posthole diggers
- Sawhorses/bench
- Ladder
- Pencil
- Safety glasses
- Gloves
- Toolbelt
- Clamps
5. Contact Your Local Building Department
Taking this step is essential. It will give you an extra set of eyeballs to assess your construction and ensure it is correct.
The building inspector can also give you valuable advice depending on the area. If you do not pull a permit, you might have difficulties completing your project, or worse, your structure could topple over.
The building department will have information on how to secure your structure to the ground, like in some areas, you need to dig 48 inches or more for your footings.
Digging that deep has to do with frost lines, so your footings will not need to be as deep if you live in a warm climate.
6. Dig Footing Holes
After laying out the structure, get the post hole diggers out and start digging. Depending on the type of footing you will use, the connection method will determine the size and depth of the hole. Standard practice is to pour the concrete into a concrete form, exposing the finished top above grade.
A concrete footing will give you the ability to use a bracket to connect the 6×6 corner post to the concrete foundation, adhering to building codes in most areas.
Pro Tip: Put plastic or a tarp on the ground to shovel the dirt onto, making cleaning up your yard easier when you are finished.
7. Secure the Corner Posts
Using a code-approved method, connect your corner posts to the concrete footings. Once the rods are connected, they need to brace in a level position, so they can’t move.
It’s essential to check the post for level before attaching more framing to it. Do not remove the bracing until the project finishes or risk the building not being plumbed.
8. Build & Secure the Rim Joist
Double up the 2x material. Typically, a doubled 2×8 or 2×10 is used for the header or rim joist. Secure the header to the front two corner posts with an approved post tie and galvanized nails or screws.
Repeat the same on the back two corner posts with the rear rim joist. Now, add angled wood braces to the corners. These will help keep the patio cover level.
9. Attach the Rafters
Cut the rafters to length and lay them all up where they go on top of the structure. Using approved post ties, secure the rafters to the beams starting on one end and space them 16 inches in the center.
Make sure that all the rafter ends line up evenly, and if they do not, you can always snap a chalk line across the top of the rafters and cut each rafter end off for length.
You can add rafter connection ties after the installation of the rafters. If you use a decorative end cut, it’s best to cut the pattern before installing the rafters.
10. Install the Slats on the Rafters
The last step of the construction process of a porch covering is to install the slats 90 degrees to the rafters. These slats will help secure the whole structure tying it all together and making it rigid.
The slats also provide a comfortable shady area on your porch to enjoy when it’s hot out. They support and secure roofing material like steel or high-quality PVC sheets.
Should I Stain/Paint the Patio Cover?
After getting the patio cover built, it’s a good time to stain or paint it. You can use a moisture meter to measure the moisture content of the wood, which outdoor wood should be less than 15% before covering or finishing.
If you used treated lumber, it is good to dry until the moisture content is low before painting. If you put a finish on wet lumber, it will not last very long, and it will start to bubble and peel.
It’s best to use epoxy-based paint or any stain or paint that can withstand damaging UV rays and other elements. Check on the durability, too, as you don’t want to repaint or stain constantly.
Do I Need a Building Permit to Build a Free-Standing Patio Cover?
The building permit processes vary from community to community, and most areas require a building permit for any structure over 200 square feet in size. So, if your free-standing patio cover exceeds that size, you will need a building permit.
You can picture this as a single car garage, approximately 200 square feet. Multiplying length times width is how you would figure out the square foot of the structure, so a 20 foot by 10-foot structure is 200 square feet.
Many building departments have all the information on their website, and you can even pull permits and pay online. You can remove a license as a homeowner when you serve as your project’s general contractor.
As stated above, you will need a sketch of your project to provide the building department with your application.
What Are the Common Building Code Requirements for a Covered Patio?
When it comes to building codes and zoning laws, a patio cover is one of the least restricted projects you can DIY. Most patios are level with the ground, so no handrail or stairs, and it is usually not attached to the home.
Footing type and depth are where most code suggestions come into play with a covered patio structure. In colder climates, you might have to dig the footing down to a depth of 48 inches to get below the frost line.
Other code regulations that can vary from city to city are:
- Public right of way or easements that do not allow building any structure.
- Set back laws from property lines can restrict where you can build.
- Power lines and other utilities can be a deciding factor on where you can and can’t build a patio cover.
- Limits on the structural size of patio covers.
- Roof loads commonly are at a minimum of 10 pounds per square foot, except where snow or wind loads are higher.
What Can I Use to Cover My Concrete Patio? (Best Materials to Use)
Wood is the most widely used material to build outdoor structures and comes in various outdoor options that are resistant to insects and rot.
Some of the most rot-resistant woods used in covered patios:
- Pressure-treated lumber
- Redwood
- Teak
- Bald cypress
- Western red cedar
- White Oak
- Black locust
- Ipe
Other materials used other than wood for a patio cover are:
- Aluminum
- Acrylic
- Canvas
- Vinyl
What is the Cheapest Way to Cover a Patio?
You’ll need to consider building on a budget, and finding ways to use as little of it as possible is natural.
The absolute cheapest way to cover your outdoor patio is called the sail shade canopy. A sail shade canopy is a generic term for any flexible fabric hung between several anchor points.
This canopy can be an old curtain, bedsheet, or even something you have lying around. The shape of the sail shade canopy can be square, triangle, or even hexagonal.
If you do with the materials you have lying around your home; you might not have to spend any money on this type of patio covering.
Are There Alternative Ways to Cover a Patio?
Covering an outdoor patio is a standard DIY project that many homeowners take on and often build with alternative materials than the ones we have covered in this article. Sometimes we need a patio cover that is a little different.
1. A Palapa for the Coastal Vibe
Want a tropical feel to your backyard? Build a palapa, which is a thatched roof umbrella for a patio. A palapa is an excellent option if you live in a warm area with little snow.
2. An Outdoor Grotto with Climbing Vines
Creating shade with climbing vines is an old practice, and there are many different types of vines you can grow for shade.
Some vines are very heavy, like wisteria and climbing hydrangea that require a solid structure like a pergola to carry their weight.
Lighter smaller vines like the morning glory and black-eyed Susan vines are easier to work with and don’t need as large a structure to carry their weight. Roses are an often missed climbing flower to use for an outdoor patio cover.
3. Modern Metal Canopy Patio Cover
Keeping with the modern industrial theme, you can add a metal canopy to your patio. A flat metal canopy for your patio cover is unique and not often used. This modern roof style works great in an urban setting on a rooftop with views of the city.
4. String of Light Patio Cover
One of the most straightforward patios covers you can choose, as easy as stringing outdoor lights back and forth over your patio.
Just gather strands of outdoor-rated lights and hang them in simple patterns across the top of your patio and on the corner posts—a quick and easy way to transform your outdoor patio’s vibe and look at night.
Conclusion
No matter the patio cover style you choose to DIY, make sure to do it properly and take safety precautions. Wear safety glasses to protect your very delicate eyes.
It is also advisable to wear a mask when cutting lumber, especially treated wood, where the treatment is toxic to breathe in. Gloves are always a good idea to protect your hands from wood slivers and getting cut.
Hopefully, you are inspired to create a unique patio covering for your outdoor space. You can use a patio cover for protection, decoration, or both. Take your time, pull the proper permits, and enjoy this fabulous DIY project you can do in a weekend.
Sources