Are you planning on setting up an outdoor kitchen and are seeking the best design ideas? If yes, you should go for durable materials and appliances that can withstand the elements.
Building an outdoor kitchen may differ depending on the design, but it mostly starts with making the frame. But before even building structures, you need to have a specific plan which includes the budget, location, and layout.
However, there are 11 steps you should remember:
- Build the frame
- Sheathe the frame
- Attach the lath
- Trowel on scratch coat
- Score the mortar
- Back-butter the stone
- Set the first course
- Shape the stones
- Trim large stones
- Veneer the rest of the frame
- Install fixtures
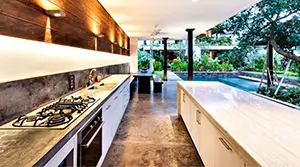
Outdoor kitchen ideas have transformed from small cook spaces and standalone grill complex designs that offer everything you need to make an outdoor stay enjoyable.
Here’s a step-by-step guide on how to build and design your outdoor kitchen.
How to Build an Outdoor Kitchen?
Building an outdoor kitchen is a straightforward process, especially if you understand the steps to follow. Below are essential steps to follow:
1. Build the Frame
The first thing you’ll need to do is build the frame, which is essential because it guides how you want your kitchen to be.
- Step 1: Create corner posts for every box, which means you need a circular saw to cut eight lengths of 2×4 to the intended height of your corner.
- Step 2: Using a screwdriver or drill, you’ll screw the 2×4’s in pairs with 2 1/2-inch screws.
- Step 3: Afterward, utilize a circular saw to cut 3 1/2-inch high and 1 1/2-inch deep at the bottom and top of each post.
- Step 4: You’ll want to separate the posts using stretchers, then cut your four 2×4’s to the deep of your box. Line up the posts, then screw the 2×4’s at the bottom and top to keep the sides together.
- Step 5: After putting the sides together, you’ll cut the 2×4’s to the width of your box less than 3-inches. Run them between the posts at the bottom and top of both the back and front of the box.
Note: If you have a cabinet, make sure to use a 2×4 to support the middle and bottom frame.
2. Sheathe the Frame
Next, you’ll want to sheath the frame, which essentially puts it into a box.
- Screw the 3-boxes together side by side.
- Flip the frame and screw a metal post standoff at the bottom of every post.
- Employ a circular saw to cut the plywood panels to fit the dimensions of the frame. Employ a bead of construction adhesive along with the stretchers and posts.
- Lay your plywood above the adhesive and screw it to your 2x4s using 2-inch deck screws.
- Allow the sheathing openings to match the cabinet openings.
- Create boxes from your plywood to fit in the framing depth for the cabinets. Join them together using 1 ¼-inch deck screws and construction adhesives.
- Build a 1 ¼-inch deep, 1-inch-wide flange around each box’s front.
- Set your boxes aside.
3. Attach the Lath
- Cover your plywood using the builder’s felt and staple them with a staple gun. Work from the bottom and overlap the felt sheets by several inches to ensure that water isn’t getting behind them.
- Examine the wire lath sheet and determine the direction the honeycombs are protruding towards. Run hands over the wires. As you lay every sheet over the builder’s felt, ensure that the wires face up.
- Employ stainless-steel roofing nails to nail the lath to your plywood at least every 12-15-inches horizontally and 6-inches vertically. Hit the framing as much as possible.
- Overlap the lath pieces at seams by several inches.
Ensure you put on gloves while working with lath.
4. Trowel on Scratch Coat
- Mix water with a bag of mortar using a masonry hoe until it appears with the consistency of peanut butter. It should also cling to a trowel that is turned upside down.
- Lay a 1x scrap board ring against the island’s bottom edge. Spread a ½-inch thick layer of mortar down to the 1x scrap and over the lath using a finishing trowel.
- Push your mortar in a downward motion into the crevices. If the lath moves at any point, nail it to the sheathing tightly.
- You should never see any mesh when you are through. Allow the scratch coat to cure for about one hour.
5. Score the Mortar
- Use a ½-inch notched trowel to score the surface horizontally when you notice that the coat is firm to touch.
- Begin one of the short ends and position your trowel on edge and vertically.
- Tilt the trowel 45 degrees, score across the short side, and continue to the front.
- Make a straight pass around the island, ensuring that the lines are as parallel and straight to the ground as possible. You’ll need the lines later as guides to settle the stone.
- Keep scoring the scratch coat with single passes until the mortar is grooved.
- Give the mortar about 24 hours to cure.
- Set your cabinet boxes in the openings.
- Use 2-inch deck screws to secure the box into the base framing.
6. Back-Butter the Stone
- Separate stones in piles of long, short, rectangular, and corner pieces to create a random color pattern.
- Begin with a corner piece. Butter the back of the L-shaped stones using a pointing trowel.
- You can then scrape any excess mortar. Employ your trowel to create V-shaped air pockets.
7. Set the First Course
- Press the L-shaped stone firmly on the grooved scratch coat starting at the corner base.
- Allow it to settle on the 1x scrap board.
- Scrape the excess mortar oozing out by pushing it into the seam to create a tight seal.
- If you knock any stone loose at any point, you must remove and reset it to recreate the seal.
8. Shape the Stones
- Keep laying stones in all directions from the corner. You should dry-fit stones before you mortar them to check their look.
- Overlap the stones and mark where they intersect.
- Shape the stone to sit tightly against the neighboring stone.
9. Trim Large Stones
- Cutaway the protruding parts of uneven stones using a miter box having a diamond blade. Place the stone cut side up.
- Set other stones around the cut face.
10. Veneer the Rest of The Frame
- After setting the first course on all four sides, begin the second from the same corner while orienting the L-shaped corner piece.
- Keep setting subsequent courses, adding stones of different sizes for a natural look. Dry-fit several stones at the same time to minimize cuts. You should also pierce them together like a puzzle.
- Don’t lay stones on the flanges of cabinet boxes.
- Put straight-cut stones over the top edge for them to sit flat on the underside of the counter.
11. Install Fixtures
- Let the stones settle for about 24 hours. You can then proceed to install cabinet doors.
- Finally, install the grill and countertops.
How to Design an Outdoor Kitchen Area?
An outdoor kitchen presents an opportunity outside your home where you can cook, prepare meals, and entertain while enjoying the open air. The kitchen expands your indoor living to the outdoor space.
One of the hardest things you’ll encounter is designing an outdoor kitchen area. Designing involves planning, creativity, research, patience, and a good amount of knowledge.
Even though you can create the kitchen yourself, we recommend hiring a professional to design everything for you.
Things to Consider Beforehand
Below are things to put into perspective while designing your kitchen space:
1. Budget
You should develop an affordable budget and stick to it. Otherwise, you risk your spending getting out of hand.
Below are budget items to have in mind:
- Material quality: If you purchase material that is higher in quality, then it may costs more but will also last much longer.
- Utilities: Make sure to plan for extra expenses such as gas, electricity and running water. These things also might require local inspections and permits first.
- Technology: Do you wish to incorporate Internet or cable in the area? Keep the extra space that you’ll need beforehand.
2. Location
Location is essential because of the climate and environment you’ll be in. The weather might severely impact the material you use to design the kitchen.
Below are things to consider when it comes to location:
- Some locations have drastic changes and temperatures throughout the year. As such, avoid natural stone countertops and tiles since they crack easily. Weather can also affect the kitchen cabinets as well.
- Incorporate shaded areas and objects that help with the weather such as pergolas, a roof, fans, outdoor heaters, etc.
- Creating exterior transitional rooms will offer shelter and shade.
- Always remember that sea air and saltwater destroy certain kitchen cabinet materials.
- Powder coat finishes will add a protection layer to the cabinets.
3. Layout
The layout is essential to have before making your outdoor kitchen. It would not be wise to continue doing anything before this establishes. You can create a gallery-style kitchen to an L-shaped kitchen. There is a layout for different areas, including patio, deck, rooftop, and backyard.
Examine your available space and use it as an inspiration for your layout. If the area isn’t enough, just run a cabinet and a grill.
If you have a bigger space, you can add a built-in grill and a few cabinets. You can also incorporate cooking, refrigeration, preparation, and bartending options.
4. Functionality
Before you design your outdoor kitchen, you must consider its functionality. Since every professional kitchen has four unique zones, you should include the same in an outdoor kitchen. Each wet, hot, dry, and cold zone must be accessible to one another.
The hot area is for cooking appliances, while the cold room is refrigerated. The wet section is in the bartending or sink station, while the dry zone is for extra counter space and meal preparation.
5. Design Options
Even as outdoor living spaces become popular, most people duplicate their indoor kitchen style, design, and color. However, others want to develop a unique space. You have a variety of options to select from.
For instance, you can opt for stainless-steel cabinets that offer storage and house appliances. They’re available with powder coatings to reduce staining and corrosion.
Kitchen countertops are also critical for the preparation of food. Depending on the climate, some materials work well in an outdoor environment, including granite, concrete, glazed ceramic tile, and stone tile.
Such options offer durability and strength while being decorative. However, it would help if you understood that the materials are subject to damage by extreme temperatures.
6. Appliances
Appliances usually improve the value of your outdoor kitchen. For instance, charcoal, electric, gas, infrared, smokers, burners, and pizza ovens support the creativity of any pro or amateur chef.
Depending on the level of entertainment and preferred cooking styles, you should consider buying versatile appliances.
Apart from concentrating on the heating elements, it would be best to consider ice makers and refrigerators. Remember that the climate and geography have an impact on refrigerated appliances.
Therefore, you should select high-performing appliances for your location to ensure the value of your investment.
7. Bar
You can incorporate add-on or standalone bars to create a standard kitchen. A fully functional bar area should have a garnish area, kegerator, glassware station, ice maker, and wine cooler.
8. Lighting
To move freely in your living space and outdoor kitchen, you should consider the lighting options. Various activities such as cleaning, eating zones, and meal preparation require proper lighting.
You can also consider proper lighting beneath or around counters. The good thing is grills have LED lights that function when you lift the lid.
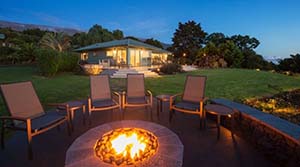
9. Seating
An outdoor kitchen can’t be complete without an exciting place to entertain friends and enjoy your meals. Here, it would help if you considered a large, low table where your guests can place plates and drinks while socializing.
Ensure there is a counter with stools for an informal gathering. If space allows, create multiple areas to drink and eat.
10. Storage
Even before you design your outdoor kitchen, consider the items that will require storage. Most kitchens aren’t critter-proof and get exposed to pollen and dust, humidity, temperature fluctuations, and precipitation. Therefore, you should store plates, glasses, utensils, and other items in plastic containers.
Food safety and convenience require a plan for outdoor air-tight bins and refrigerators. Air-tight containers are available in different sizes and offer accessibility while keeping pests out.
It would be best to remember that proper maintenance improves the lifespan of stainless-steel kitchens. Ensure you get rid of debris and foodstuff from surfaces.
Even though designing an outdoor kitchen presents different challenges, it can be fun and straightforward if you follow the proper guidelines. If you’re looking for a perfect design, approach a qualified architect or design professional.
Best Materials for an Outdoor Kitchen
As far as designing an outdoor kitchen is concerned, weatherproof materials are the best option. You can select various materials based on your preferences, budget, and garden design ideas.
- Stainless steel offers a fabulous and sophisticated complement to contemporary landscaping ideas. You can use it well with your grill and other appliances. However, it can get very hot and presents a high-budget option.
- Powder-coated stainless steel presents a colorful finish.
- You can also employ wooden cabinets to blend with the surroundings. They also present a good option for rustic garden ideas. However, they require regular maintenance. You should use wood cabinets to wrap grills for safety purposes.
- Stone, brick, and cement offer a durable and stronger option that can withstand the heat from your grills. They also allow you to give your outdoor kitchen a unique look. However, they are harder to clean compared to other options.
- High-density polyethylene (HDPE) is often employed in creating furniture, but you can also use it to develop outdoor kitchens. They come in different and unique color options. However, the colors aren’t very pleasing. You can even make an outdoor kitchen counter from these materials.
- Granite presents the appearance of natural stone. However, it’s heavy; thus, your cabinets should be able to withstand the weight. Be careful with spills which can cause stains on granite. You should also note that granite comes at a higher cost.
- Concrete is hard-wearing and provides a quality appeal.
- There is also an option of using tiles, especially if you’re operating on a tight budget. Ensure you select tiles that are perfect for outdoor use. You should also be aware that grout is harder to clean and can stain compared to tiles.
Conclusion
Designing your outdoor kitchen is straightforward, especially if you follow the set guidelines. You can select from any materials we have recommended above if you want your outdoor kitchen to be durable and efficient.
It would be best to run a water supply from inside the house. There is also the need to install a healthy drainage system.
Depending on your water pipes and climate, you can winterize your plumbing to prevent damages. As highlighted above, select a perfect location for your outdoor kitchen and sink.
It would also help to check the building permits to ensure that your design actions are legal. However, we recommend approaching a qualified professional to design everything for you.
Sources