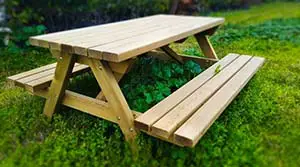
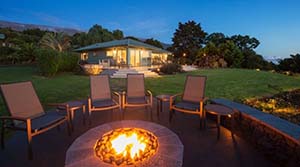
Picnic tables offer durable outdoor seating for large and small gatherings and can last for many years if properly maintained and cared for. If you leave your picnic table uncoated, it’s likely to decay due to exposure to falling leaves, rain, and sunlight.
Fortunately, there is an attractive array of clears, paints, and stains that you can select from to make your picnic table last for years.
Sealing or painting the table at least once per year can make the table last indefinitely and improve its physical appeal.
Here, we consider the tips for waterproofing and painting a picnic table to make it visually appealing and improve its lifespan.
How Do You Seal & Paint a Picnic Table?
A picnic table makes your outdoor space more welcoming and comfortable for your family and friends. You can improve the appeal of your picnic table further by adding quality paint to the surface.
Painting your picnic table is an easy task as long as you have the right tools for the job. There are a variety of approaches that you can employ to transform your outdoor picnic table into something more colorful. However, you need to ensure that you select a paint formulated for outdoor purposes.
Tips for Painting Your Picnic Tables
1. Pick the Perfect Paint
Selecting the perfect paint is critical, especially if you want your picnic table to be more durable. Choosing the wrong paint formulation will translate into the color flaking off after a short period, and the table may end up looking shoddy and shabby.
An oil-based enamel paint having a high UV rating is among the best exterior colors you can consider for wooden furniture. Always choose top-quality paints instead of opting for cheap options. A quality paint offers a better and long-lasting finish.
2. Prepare Before Painting
Remember to prepare your picnic table before painting it. If you decide to paint your picnic table with a coat of exterior paint without first cleaning it, the color will flake off within no time.
It’s therefore critical that you clean your picnic table to remove any grime, dirt, or dust using a clean cloth. After you’re through with removing any debris from your picnic table, and the table surface with medium-grit sandpaper.
3. Apply Primer or Base Coat
After you have sanded the whole picnic table surface, it’s now time to apply a primer or base coat over the picnic table.
Even though many homeowners skip this critical step, it’s important to remember that a primer offers a smooth table surface for the paint to stick to and protects the table from elements. Apply a top-quality primer on your table using a wide paintbrush.
4. Apply Two Coats of Paint for Best Results
If you want the best results, it’s better to apply two coats of paint instead of one. After applying the first coat of paint, sand the table using fine-grit sandpaper. Grinding your picnic table offers a better and smoother finish.
Ideas for Painting Your Picnic Table
Now that you can paint your picnic table effectively, we can consider the different painting techniques that offer the best results.
- Sponge painting: If you want the most effortless approach to painting your picnic table, then you can consider the sponge painting. Sponge painting offers your picnic table a modern vibe.
- Contemporary look: You can give your picnic table a contemporary look by sponge painting it in a deep color like dull gold or teal.
- Paint in different colors: Another option would be to paint long stripes in two different colors. If you decide to go with this option, start by applying a base color like eggshell blue on your picnic table and then allow it to dry thoroughly.
Place a painter’s tape along the entire length of your picnic table, ensuring that you leave a 2-inch gap in between. You can then paint the table with different colors over the untapped section, like apple green. After painting, always allow the paint to dry completely.
Remove the tape to enjoy the beautiful striped picnic table. There is also an option of going for a checkered design with two contrasting paint colors.
- Geometric design: Another perfect option would be to apply store-bought stencils in geometric or floral motif to develop a beautiful pattern on your picnic table.
Painting an old picnic table offers it a new lease of life. Apply any of the recommended ideas above to create a picnic table that provides a fun look to your outdoor environment.
How Do You Prepare a Picnic Table for Painting?
It would be best to prepare your picnic table before painting it to achieve excellent results. The preparation process starts by cleaning the picnic table using soapy water. Here, the aim is to remove any grime or dirt from the picnic table surface.
After the surface is clean, you can sand it to ensure that it’s splinter-free. You can then rinse the surface after rubbing. Let the surface dry before applying any paint.
After your picnic table surface has dried, you can start by priming the critical areas of the table using a small angle brush.
However, ensure that you prepare the picnic table and do actual painting at room temperature for the best results. Avoid preparing or painting the table in direct sunlight. Select a perfect shade to allow for slow drying.
How Do You Weatherproof a Picnic Table?
Most of the cabinetry and delightful furniture is designed from wood, the industry’s best-loved and oldest building material.
However, wood suffers from exposure to high humidity and moisture without protection, resulting in rotting, warping, and swelling.
Fortunately, there are several products that you can employ to weatherproof your wooden picnic table and, at the same time, enhance its natural appeal.
There are three proven approaches that you can employ to weatherproof or waterproof your picnic table:
- Waterproof and finish wood simultaneously using a stain-sealant combo.
- Sealing the picnic table using a coat of varnish, lacquer, and polyurethane.
- Employing tung or linseed oil to create the protective and beautiful hand-rubbed finish.
While selecting the best approach for you, remember that some methods are suitable for light- or dark-grained wood while others are best for exterior or interior items.
Materials & Tools
- Rags
- Linseed oil
- Mineral spirits
- Fine-grit sandpaper
- Natural bristle paint brush
- Wood varnish
- Lacquer
- Polyurethane
- Wood sealant and stain
- Polyurethane sealant
Below are the approaches you can use to weatherproof your picnic table:
Develop a Warm, Hand-Rubbed Oil Finish
Tung oil extracted from the Chinese Tung tree, and Linseed oil extracted from the seed of the flax plant, are the basis for hand-rubbed oil finishes.
The two have been used for a long time to protect and beautify dark-grained woods such as mahogany and walnut. Blending the two oils with other ingredients eliminates stickiness and hastens drying times.
There is an option to buy pre-blended linseed oil and tung oil products or mix your own for a custom finish. A standard hand-rubbed oil blend comprises one-part polyurethane, one-part mineral spirits, and one-part oil (boiled linseed or tung).
If you want to weatherproof a lighter wood such as ash or pine, this isn’t the perfect approach for you. Here, you employ a natural bristle paintbrush to dark-grained lumber that is already cleaned and sanded.
It would help if you allowed the oil to soak into the table’s surface and reapply to spots that appear dry. Use a rag to wipe off and remove any residual and excess grease.
Let the wood dry thoroughly for about a few hours. However, it can even take overnight, depending on the degree of your oil mixture. Use fine-grit sandpaper for sanding the wood lightly. Repeat the process by applying various coats to get a fine finish.
If you want to get a thicker product, use less mineral spirit. Reducing the amount of polyurethane will allow you more working time before the finish dries. Adding more poly provides quicker drying time and a glossier finish.
Apply Sealants for the Best Protection
Varnish, lacquer, and polyurethane are among the most reputable sealants that offer excellent weatherproofing properties. These sealants are sprayed on clean wood and then allowed to dry before you re-sand and recoat the piece.
If you want to acquire the best results, you need to apply the finish at room temperature. Avoid shaking and stirring the sealant before using it. If you shake or stir the cement, bubbles will form that remain on your surface.
Ventilation is necessary while using the above sealants since they often contain chemical solvents. Below are the advantages and disadvantages of popular adhesives:
- Polyurethane sealants: Apart from having acrylic and polyurethane resins, polyurethane sealants also contain other solvents, thus allowing you to select your favorite finish effect.
You’ll get products ranging from gentle, soft sheen to a high-gloss shine. Nowadays, polyurethane isn’t yellow, thus being perfect for light-toned woods.
The oil-based polyurethane provides greater durability. However, brush cleanup requires turpentine and mineral spirits. For water-based polyurethane, you need water and soap. - Varnish: Which combines drying oil, solvent, and resin and provides a hard-shell finish that prevents scratches without yellowing. For effective waterproofing of outdoor picnic tables, a select marine varnish has UV absorbers to resist damage from the sun.
- Lacquer: It involves a mixture of synthetic resin and dissolved tree resin in alcohol. Even though it can develop an unattractive yellowish tinge with time, it brings out a warm, rich, and scratch-resistant finish on deep-toned picnic tables.
You can thin it using lacquer thinner and it is available in different sheen options. For effective performance, apply lacquer in different light coats.
However, lacquer produces strong fumes that can be poisonous. You should, therefore, ensure proper ventilation while working with the sealant.
Work Fast Using Stain-Sealant Combos
When protecting a more extensive project or time, using a quality stain-sealant combo is of great essence. Such a multitasking product adds color to your picnic table while at the same time offering water resistance in a single step.
These products have color pigments containing binders that include water-, oil-, or alkyd-based. Based on your product’s pigment concentration, the outcome can be opaque, transparent, or in-between.
If you decide to apply a stain-sealer to your picnic table, ensure you reapply it at least yearly or after two years to protect the wood effectively. Stain-sealants won’t build up on the picnic table surface, except for alkyd-based products. Instead, the products soak into the wood with the excess evaporating.
You should ensure that you clean and dry your wooden picnic table effectively before applying any stain sealant.
Considerations While Purchasing an Exterior Paint or Sealant
As we have seen, painting and waterproofing your picnic table can be simple, especially if you understand the critical steps. One important thing you should realize involves the type of paint and sealant that you should purchase for such a purpose.
Below are considerations to consider while selecting the best sealant or paint for waterproofing or painting your picnic table.
1. Durability
The exterior environment is exposed to damaging factors like harsh UV rays, sleet, frost, insects, rain, and strong winds compared to the interior environment.
The durability of the sealant and paint you buy will determine how they’ll stand against such elements. Since you’re likely to spend a lot painting your picnic tables, you should ensure that the paint you settle for lasts longer.
Most manufacturers offer the expected lifespan of the sealant or paint when you purchase. Some manufacturers are confident enough to provide a warranty on their products.
Remember, the higher the warranty you get, the higher the quality of paint or sealant.
2. Endurance
The endurance of the paint or sealant goes hand in hand with its durability. A good quality paint or glue should endure a variety of abuses. For instance, harsh stains should be easy to clean using soap and water.
Quality paint or sealant also presents a high rub resistance. It means that it can withstand wiping, friction, and scratching, especially in high-traffic areas.
Nobody wants their picnic table to look worn out and tired just a few months after painting. To achieve this quickly, ensure you buy paint with excellent bonding ability.
Quality paint reduces peeling, adheres to the surface, and limits chipping on complex picnic table surfaces.
3. Better Coverage
High-quality paint or sealant provides better coverage with a minimal coat. Some stains present priming qualities meaning that a single coat offers quality results.
Purchase a paint or sealant that won’t require two coats to produce quality results.
4. Applies Evenly
The best exterior paint isn’t too thick or too thin. It should flow smoothly and efficiently off the roller or brush and onto your picnic table surface.
It makes the application easy. If the paint is thicker, it’ll clump or sag if it doesn’t dry evenly, and when it’s thinner, it’ll run during application.
Quality paint is the one that doesn’t splatter while coming off your roller or brush.
5. Price
You’ll get what you pay for when it comes to paints and sealants. Professional recommends that you opt for expensive and top-quality exterior colors instead of cheap ones since they’ll save you money for the long term.
An expensive paint comes with more durability, and you’ll repaint it less frequently. However, some professional painters and homeowners have found success in mid-priced colors.
If you seek good durability and the best results, consider spending more money on a product.
Conclusion
It’s a fact that if you leave your picnic table uncoated, it’s likely to decay and rot because of exposure to rain and sunlight.
There is, therefore, the need to apply top-quality paints and sealants on your table’s surface to ensure durability and exciting visual appeal.
We recommend that you seal and paint your picnic table at least once per year if you want the best results. Even though selecting the best sealant and paint isn’t easy, you can find the best one for you if you keep the considerations we have highlighted above in mind.
However, if you find painting difficult, it would help involve a professional painter. Even though it means an extra cost, it might be worth it in the long term.
Sources